Blog

  • How Long Does a Sandwich ELISA Take? Stage-by-Stage Timing

    A standard sandwich ELISA in a commercial pre-coated kit takes 3.5 to 4.5 hours, from equilibration to reading the plate. Optimised rapid kits bring that down to about 2.5 hours. If you coat the plate yourself, add an overnight step: 12–16 hours at 4 °C plus 1–2 hours of blocking, for a total of 14–18 hours.

    The useful part is not the total — it is which stage you can compress without losing sensitivity.

    Total time by format

    FormatTotal timeWhat changes
    Standard pre-coated kit3.5 – 4.5 hThe reference protocol. Best stability and reproducibility.
    Rapid kit2.5 – 3 hHigher antibody concentration and shorter incubations. Suitable for screening; sensitivity drops slightly.
    In-house coated plate14 – 18 hOvernight coating at 4 °C (12–16 h) plus blocking (1–2 h), then the normal sequence.

    Stage-by-stage, for a standard kit

    StageTimeCondition
    Reagent and sample preparation30 – 60 minBring kit to room temperature, centrifuge sample, prepare dilution series
    Sample / antigen incubation1 – 1.5 h37 °C — antigen binds the capture antibody
    Wash~10 min5 washes and pat dry
    Enzyme-labelled detection antibody30 – 60 min37 °C — completes the capture–antigen–detector sandwich
    Second wash~10 min5 washes — removes unbound conjugate and keeps background down
    TMB development15 – 30 min37 °C, in the dark, until a clear blue gradient appears
    Stop and readwithin 15 minRead OD at 450 nm immediately after adding stop solution

    Where the time can and cannot be cut

    Washing is not the place to save time. Five short washes remove interfering material better than one long soak, and they already take only about ten minutes. Shortening them costs background.

    Incubations are where the savings are — but they are a trade. Reducing antigen and conjugate incubation is exactly how a rapid kit gets to 2.5 hours, and the price is a little sensitivity. For a screen that is a fair trade; for a low-abundance analyte it usually is not.

    Automation trims 15–20 % of the total, mostly by removing the manual gaps between steps: an automated washer and temperature-controlled incubation cut the waiting, not the chemistry.

    The read is not negotiable. Add stop solution and read at 450 nm within 15 minutes; the colour keeps developing and the numbers drift.

    Frequently asked questions

    Can I leave the plate overnight between steps?

    Not in the middle of the sequence. The sandwich is held together by non-covalent binding, and an overnight pause between steps lets it come apart and lets background rise. Plan the run so the incubations happen in one sitting.

    Why is my run taking longer than 4.5 hours?

    Usually sample preparation and dilution series, which are outside the kit protocol and can take an hour on their own. Plate washing by hand also stretches the two wash steps.

    Does a longer incubation give a better result?

    Beyond the specified time, no. Once binding has equilibrated, extra time adds background rather than signal.


    Note: The information on the scientific research products above is for reference only!
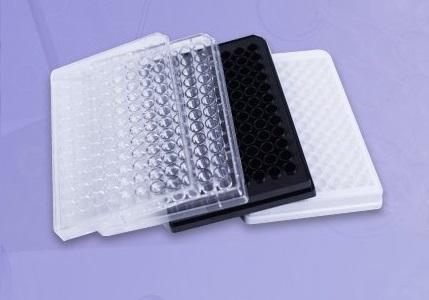
  • U-Bottom Low-Binding 96-Well Plates for ELISA Pre-Incubation

    Short answer: yes — for the pre-incubation step, not for the assay itself. A U-bottom low-binding 96-well plate is a good vessel for diluting, neutralising or pre-mixing a sample before it goes onto the ELISA plate. It is not a substitute for the coated plate, because it has no polystyrene activation and cannot immobilise capture antibody.

    What the pre-incubation step is for

    Before a sample reaches the coated plate it often has to be diluted, neutralised against an interfering matrix, or pre-mixed with blocking solution or a neutralising antibody. That happens in a separate vessel, and whatever is lost in that vessel never reaches the assay. With a low-abundance analyte, the vessel is the problem.

    Why a U-bottom low-binding plate

    • Adsorption. BUNSEN specifies an electrically neutral, inert hydrogel coating covalently bound to the well wall, which holds antibody, antigen and protein adsorption below 0.1 %. On ordinary microplates a meaningful fraction of a dilute analyte adsorbs to the plastic and is never measured.
    • Recovery. For low-abundance samples the manufacturer reports recovery improved by more than 20 % against conventional plates — which is the difference between a signal and no signal at the bottom of a standard curve.
    • U-shaped base. Sample and pre-incubation reagents collect at the centre of the well, so micro-volumes mix thoroughly without vigorous shaking and without the local heterogeneity you get on a flat base.
    • No added background. A super low-binding surface does not induce the non-specific conformational changes associated with TC-treated plates, so it does not add a background that competes with the antigen–antibody reaction you are trying to measure.
    • Fits automation. ANSI/SBS footprint, so it loads straight onto pipetting workstations, and the pre-incubated sample can go directly to the ELISA plate by multichannel pipette without an intermediate vessel.
    U-bottom low-binding 96-well plate used for ELISA sample pre-incubation

    Where it fits — and where it does not

    Good fit: low-abundance cytokine ELISA, microcirculation marker detection, pre-neutralisation of valuable clinical samples, and pre-reaction of serially diluted samples where every microlitre of recovery counts.

    Not a fit: as the assay plate. Without polystyrene activation the surface cannot capture antigen or antibody by passive adsorption, and it is not intended for the final colorimetric read. Pre-incubate here, then transfer to the coated plate.

    Practical notes

    • Keep the pre-incubation volume between 50 and 200 µL per well.
    • After incubation, aspirate the whole volume with the tip held against the well wall. That reduces residue and keeps the volume accurate for the next addition.
    • Because the plate is SBS-standard, the transfer to the ELISA plate can be done with a multichannel pipette in one pass — no intermediate tube rack.

    Frequently asked questions

    Can I read the ELISA directly in the low-binding plate?

    No. It is a pre-incubation vessel. The colourimetric reaction belongs on the coated assay plate.

    Does the U-bottom matter if I am only diluting?

    It helps at small volumes. A U-bottom collects the liquid at one point, so a 50 µL pre-mix mixes properly without shaking; on a flat base the same volume spreads thin and mixes unevenly.

    Is a low-binding plate the same as a TC-treated plate?

    No — and that is the point here. TC treatment is designed to make cells attach; it also introduces non-specific protein interaction. A low-binding surface is engineered for the opposite.


    Note: The information on the scientific research products above is for reference only!
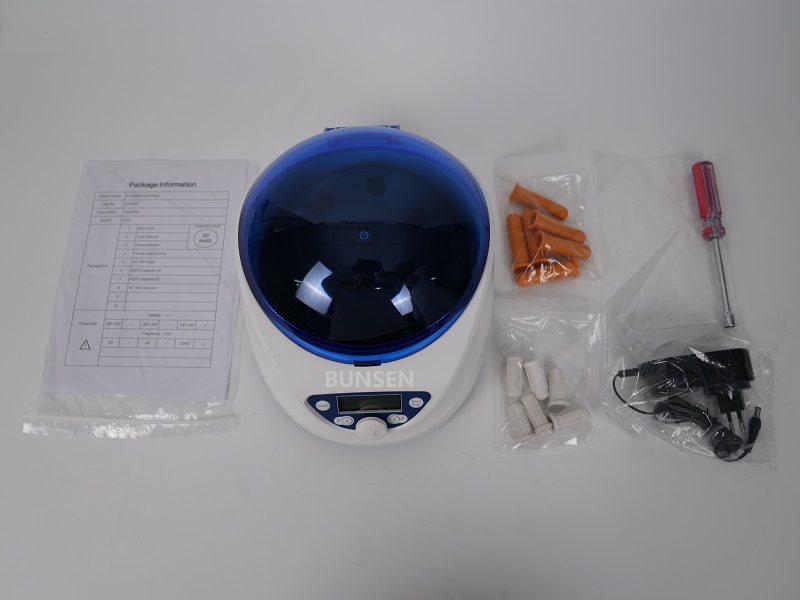
  • Mini Benchtop Centrifuge: Five Everyday Lab Applications

    A mini benchtop centrifuge is not a smaller version of a floor-standing machine. It exists for the short, frequent spins that happen between steps: pulling liquid off a tube cap, settling a reagent before you open it, levelling a plate before it goes into the cycler. None of those warrant a full-size run, and all of them cost a sample if they are skipped.

    The format that makes this work is compact, stops automatically when the lid is opened, and runs quietly enough to sit at the bench rather than in a separate room.

    1. Blood samples, before they sit

    For 1.5 mL micro blood-collection tubes and fingerstick samples, a short spin at 4,000–6,000 rpm separates cells from plasma or serum and gives a first stratification. Doing it at the collection point rather than sending the tube to a central lab is the point: blood that stands too long haemolyses, and haemolysis ruins the downstream nucleic acid work before it begins.

    That makes the mini centrifuge useful in primary-care clinics and at field sampling sites, where it shortens the wait before extraction.

    2. Spin-down after every extraction step

    Lysis buffer and eluent cling to the cap and the tube wall. A few seconds of spin brings all of it to the bottom, where the sample actually is.

    Skip this and the loss shows up as poor recovery — most visibly with trace DNA or RNA, where a few microlitres left on the wall is a meaningful fraction of the total. No programme has to be set: close the lid, it runs, it stops. It is probably the single most repeated operation in a molecular lab.

    3. Before the PCR reaction

    After adding master mix, primers and template, a brief spin settles everything off the tube wall and removes bubbles from the liquid column. That matters for three reasons: bubbles expand during thermal cycling and can push reaction out of the tube, trapped air distorts the volume, and uneven starting volumes produce well-to-well differences that look like assay noise.

    Both 0.2 mL single tubes and 8-strip tubes are handled, and a whole strip can be spun at once — which is the difference between preparing a strip and preparing eight tubes one at a time.

    Mini benchtop centrifuge with microtube rotor used for short spin-down steps

    4. Reagent aliquots

    Primers, enzymes and probes arrive as lyophilised powder or as concentrate, and both sit on the wall of the tube after shipping. A short spin before opening brings the material down.

    Without it, opening the cap can throw powder into the air — a splash that wastes an expensive reagent and, worse, distributes nucleic acid aerosol across the bench. It works with 0.5 mL and 1.5 mL tubes and does not tie up the high-speed machine for a ten-second job.

    5. Sealed plates, before cycling

    Once a 96-well PCR plate is sealed, a short low-speed spin with a microplate adapter drives liquid off the well walls to the bottom. Two problems go away at once: peripheral wells no longer sit at a different level from the middle of the plate, and the edge wells lose less volume to evaporation during the run.

    The five applications at a glance

    ApplicationWhat the spin preventsSetting
    Blood sample pre-separationHaemolysis from standing; waiting for a lab4,000–6,000 rpm, short
    Spin-down after extraction stepsLoss on cap and wall; low recovery of trace nucleic acidSeconds
    Before PCRBubbles, overflow during cycling, well-to-well volume differencesBrief
    Reagent aliquotsSplash and aerosol on opening; wasted reagentBrief
    Sealed PCR platesUneven levels and edge evaporationLow speed, short, plate adapter

    Frequently asked questions

    Can a mini centrifuge replace a benchtop centrifuge?

    No. It covers short, low-to-moderate speed spins. Separations that need high RCF, larger volumes or long runs still belong on a full-size machine.

    What speed for a spin-down?

    Enough to move liquid off the wall and no more — a few thousand rpm for a few seconds. Higher speeds add nothing and heat the sample.

    Why spin a plate after sealing?

    To level the wells and cut evaporation from the edge wells. It is a small step that removes a common source of well-to-well variation.


    Note: The information on the scientific research products above is for reference only!
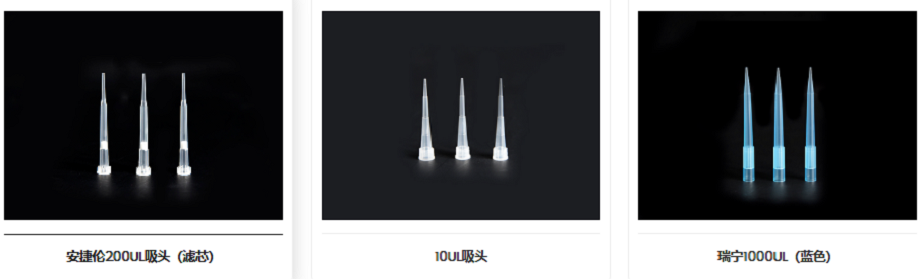
  • Sterile Filtered Pipette Tips, 10 µL Extended: Uses and Fit

    A 10 µL tip is for the smallest volumes in the lab — a few microlitres of template, primer or enzyme. Making it extended and filtered solves two practical problems at the same time: reaching the bottom of a narrow vessel, and keeping the pipette barrel out of the aerosol path.

    What the extended length changes

    A standard 10 µL tip is short. That is fine in a shallow microplate well, but in a deep-well block, a PCR tube or a microcentrifuge tube the tip stops well above the liquid. The extended version adds reach so that the tip can draw from the bottom of these containers without the barrel touching the rim.

    The practical gain is twofold: you can withdraw the last few microlitres instead of abandoning them, and the pipette shaft stays clear of the vessel mouth — which matters when that mouth has just been through a thermal cycler.

    What the filter is for

    The filter in the tip is an aerosol barrier. It sits between the sample and the pipette barrel, so aerosols generated during mixing, vortexing or pipetting up and down stay in the tip rather than travelling up into the shaft.

    • It protects the instrument. A contaminated barrel will carry nucleic acid into the next sample, and it is not something you can see or clean easily.
    • It reduces cross-contamination between samples — the failure that shows up as a band in a no-template control.
    • It complements sterility rather than replacing it. Filtered and sterile are separate claims; a boxed, sterile pack is what you want for work where both matter.

    Where these tips are used

    • PCR and qPCR setup. Dispensing template, primers and master mix in single-digit microlitre volumes, where the filter keeps aerosols out of the pipette.
    • Nucleic acid extraction and detection. DNA and RNA work where a stray aerosol from the previous sample is a false positive waiting to happen.
    • Genotyping and sequencing preparation. Cleanliness requirements are high and volumes are small, so both features earn their place.
    • Cell culture media and reagents. Accurate pipetting of small reagent volumes with the pipette kept clear of the vessel.
    • Protein and biochemistry work. Protein quantification, enzyme reactions and buffer preparation, all of which are microlitre-scale.
    • Transfers between plates and tubes. Moving micro-volumes between 96-well plates, PCR plates and centrifuge tubes — the case where reach and cleanliness both matter.
    Sterile filtered 10 microlitre extended pipette tips in a boxed rack

    When a shorter tip is the better choice

    Extended tips are not a universal upgrade. In a shallow 96-well plate the extra length puts the tip closer to the well wall, which makes touching off droplets harder, and the longer column of air slightly changes how a 1–2 µL volume behaves on aspiration. If the vessel is shallow and the volume is tiny, a standard 10 µL tip is often the more controllable option.

    Frequently asked questions

    Are filtered tips sterile?

    Not automatically — they are two separate properties. Look for tips that are both filtered and supplied in sterile, individually sealed boxes if your workflow needs both.

    Why use an extended tip for a deep-well plate?

    Because a standard 10 µL tip cannot reach the liquid at the bottom of the well. The extended tip draws from the base of the well without the barrel entering the plate.

    Can I use 10 µL filtered tips with any pipette?

    They fit pipettes that accept the standard 10 µL tip cone. For pipettes with a proprietary shaft — Rainin LTS being the common example — a dedicated tip series is required.


    Note: The information on the scientific research products above is for reference only!
  • How to Assess qPCR Sealing Film Quality: Five Practical Checks

    qPCR sealing film is not ordinary PCR film. It has to stay optically clear through 40 thermal cycles, add almost no fluorescence of its own, and hold 20 µL of reaction at 95 °C without losing volume. Five checks decide whether a film is fit for quantitative work — and four of them can be done in the lab with water, a printed page and a centrifuge.

    1. Visual screening

    • Surface. A good film is smooth and evenly transparent, with no white spots, crystalline patches, pinholes or scratches. Dull, cloudy film with visible particles will scatter light.
    • Thickness. Stack several sheets and compare. Uneven thickness means some areas will seal poorly and others will tear during application.
    • Odour. Film should smell of nothing much when the pack is opened. A sharp plastic or solvent smell suggests residual volatiles, and those become contamination in a 20 µL reaction.

    2. Optical performance — the qPCR differentiator

    This is where sealing film for qPCR separates from general-purpose film, because the detector has to read fluorescence through the film.

    • Transmittance. Lay the film over printed text of standard size. If the text reads clearly through it, transmittance is very likely 90 % or better. If it does not, the film will attenuate the signal.
    • Autofluorescence. Illuminate the film directly. Visible blue or green glow means strong autofluorescence and the film is unsuitable. A more rigorous version: seal a blank plate and run a baseline scan — if the background reads more than 20 % above an accepted control film, reject it.
    • Signal stability. The same film should return comparable signal at cycle 10 and cycle 40; a drop across the run points to scattering rather than attenuation.

    3. Sealing and temperature resistance

    • Evaporation. Add 20 µL of buffer to every well of a 96-well plate, seal, and run 40 standard qPCR cycles. A good film averages 3 % or less evaporation, which is what makes 5–20 µL reaction volumes viable.
    • Seal integrity after cycling. After the run, check for blistering, delamination or lifted edges. Invert the plate for 30 seconds with the wells pierced: no leak means the seal held.
    • Spin resistance. The film should survive 2,000 ×g for 10 minutes without rupturing.
    • Freeze–thaw. Store a sealed plate at -80 °C for 7 days, then thaw. No brittle cracking, no delamination and no condensation inside the wells. Across the two tests the working range is roughly -80 °C to 120 °C.

    4. Handling and fit

    • Peel strength. 0.5 N/cm or better, holding through high-temperature cycling and peeling off without adhesive residue on the plate rim.
    • Puncture. A tip should pass through cleanly without shedding film particles into the well — particles are a contamination route, not just a nuisance.
    • Footprint. SBS-standard dimensions, typically 140 × 80 mm for a 96-well plate.

    5. Documentation and material

    Ask for the test report: DNase, RNase and pyrogen results should be stated, not implied. On material, polyolefin and modified polypropylene give better optical purity than standard PET or PP film, which is the practical difference between a film that reads cleanly and one that adds background.

    Pass criteria at a glance

    CheckPass criterion
    Light transmittance90 % or better (standard printed text legible through the film)
    AutofluorescenceBaseline no more than 20 % above an accepted control film
    Evaporation, 40 cycles at 20 µL3 % average or less
    Seal after cyclingNo blistering, delamination or lifted edges; inverted 30 s, no leak
    Spin resistance2,000 ×g for 10 min without rupture
    Freeze resistance-80 °C for 7 days, no brittleness or delamination
    Peel strength0.5 N/cm or better, no adhesive residue
    FootprintSBS standard, 140 × 80 mm

    Frequently asked questions

    Can I use ordinary PCR film for qPCR?

    Not if you intend to quantify. Standard film is often made for optical clarity at lower demands, and its autofluorescence can swamp a small signal. If the film was not specified for qPCR, assume it will add background.

    How do I test a film without running a full plate?

    Two quick checks: read printed text through it to judge transmittance, and scan a sealed blank plate on the instrument to measure background against a control film.

    Does the film matter at 5–20 µL volumes?

    More than at larger volumes. A 3 % evaporation loss is negligible in a 100 µL reaction and significant in a 5 µL one, which is why the evaporation test is run at 20 µL.


    Note: The information on the scientific research products above is for reference only!
  • 15 mL and 50 mL Centrifuge Tubes: Maximum RCF and Seal Testing

    A 15 mL or 50 mL tube is the workhorse of the benchtop centrifuge, and almost every failure traced back to one of two things: running it faster than it is rated for, or spinning with a cap that was never going to seal. This page sets out the ratings, the margin to keep, and a two-step test that catches a bad seal before the sample is in the tube.

    Maximum RCF by model

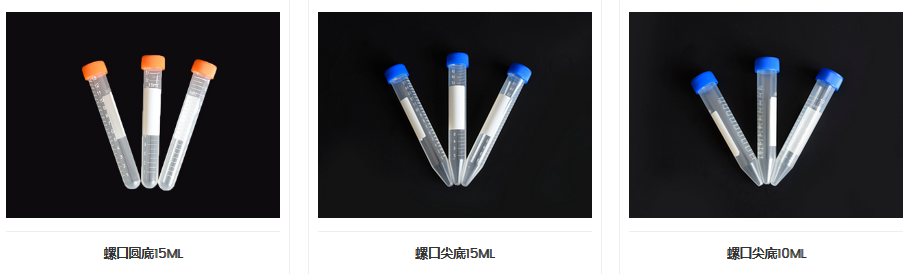
    Standard polypropylene 15 mL and 50 mL tubes are rated between 10,000 and 17,500 ×g and 12,000 and 16,000 ×g respectively. The exact figure depends on the brand and model, so the range is only a planning guide — the number printed for your tube is the one that applies.

    Model15 mL tube50 mL tube
    Standard10,000 ×g12,000 ×g
    Upgraded (reinforced wall)12,000 ×g16,000 ×g
    15 mL and 50 mL centrifuge tube maximum RCF comparison by model

    The rated maximum is not a working speed

    That number is the ceiling the manufacturer verified under controlled conditions. Routine work should stay well below it: a safety margin of at least 20 % is the usual practice, which puts a 12,000 ×g tube at roughly 9,600 ×g for everyday use.

    Three things quietly reduce the real limit:

    • Temperature. Both very low and very high temperatures change how the polymer behaves under load.
    • Fill volume. An overfilled tube has less headspace and more mass, and the cap takes load it was not designed for.
    • Rotor type. A fixed-angle rotor loads the tube differently from a swinging-bucket rotor, and the same tube can tolerate less.

    Capacity alone tells you nothing about strength. A 15 mL polystyrene tube holds the same volume but manages only about 1,800 ×g — roughly a sixth of a standard polypropylene tube. Material, not size, sets the limit.

    Check the seal before every spin

    Visual inspection

    • Look for cracks or deformation in the cap, and for stripped threads on the cap or at the tube neck.
    • If the cap has an O-ring, confirm it is in place, undamaged and has not shifted out of its groove.
    • Screw the cap down and check that it has not gone on at an angle. A double-thread cap has to be fully engaged, not just tight.

    The two-step water test

    Step 1 — invert test. Fill the tube to about two-thirds with clean water, tighten the cap and stand it upside down for one minute. Any weeping at the cap joint fails the tube.

    Step 2 — spin test. Load the filled tubes symmetrically in the rotor and run for 5 minutes at 80 % of the tube’s rated maximum. Stop the run, take the tubes out and check the cap-to-body joint for leaks. If it is dry, the seal is good for that speed.

    Both steps take a couple of minutes and use water, not sample — which is the point.

    Frequently asked questions

    Can I run a 15 mL tube at 15,000 ×g?

    Only if that specific tube is rated for it. Standard models top out between 10,000 and 17,500 ×g depending on brand, and upgraded models are usually rated around 12,000 ×g. Check the printed rating and keep the 20 % margin.

    Why did my tube crack if I stayed under the limit?

    The usual causes are an overfilled tube, a rotor that loads the tube differently from the one the figure was measured on, a cap that was cross-threaded, or repeated autoclaving that has weakened the wall.

    Is the water test enough to trust a seal?

    For aqueous samples, yes — it catches the common failures. For volatile solvents, use a screw cap with an intact O-ring and treat the water test as a basic check rather than proof.


    Note: The information on the scientific research products above is for reference only!
  • Centrifuge Tube Selection Guide: Capacity, Fit, Material and Seal

    Most centrifuge tube problems are not manufacturing faults. They are selection faults: a tube that did not fit the rotor, a cap that did not hold a volatile solvent, or a standard tube pushed past the speed of a high-speed protocol. This guide sets out the four decisions that actually matter — capacity, rotor fit, material and seal — and the order to take them in.

    1. Capacity: match the tube to the sample and the step

    Capacity follows the sample volume and what the step is meant to achieve. Pick the smallest tube that holds the volume comfortably; a tube filled to the shoulder is hard to cap cleanly and easy to spill during decanting.

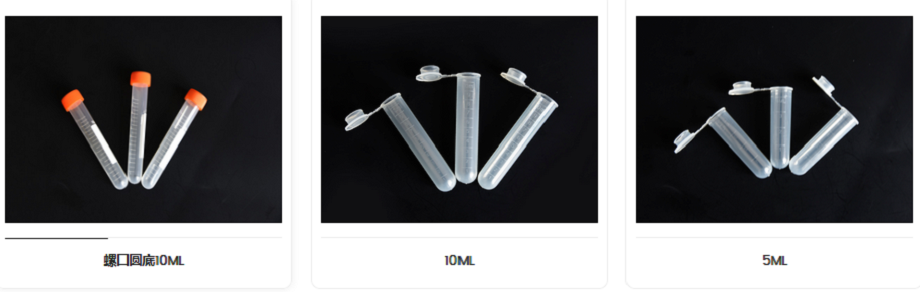
    CapacityTypical useWhy this size
    0.2 mLPCR reactionsFits thermal block formats; minimal dead volume around a small reaction.
    0.5 – 2 mLMicro-volume nucleic acid extraction, protein work, precipitationThe pointed base concentrates a small pellet at one point, which makes the supernatant easy to remove by pipette.
    5 – 10 mLSmall volumes of culture medium; aliquoting standard reagentsA middle size that balances handling convenience against throughput.
    15 mLCell culture, serum separationThe conical base encourages cells to form a compact pellet at a defined spot, and the format suits standard benchtop rotors.
    50 mLLarger sample volumes, protein purification, tissue homogenisationReinforced walls take higher speed work, and most models stand upright on the bench without a rack.
    400 mL – 1 LFloor-standing centrifuges; bulk clarification; batch separationRequires the matching rotor and the dedicated adapter for that rotor.
    Centrifuge tube capacity range comparison chart

    2. Rotor fit: the check that prevents most breakage

    A tube must sit in the rotor exactly as the rotor was designed for it. Three things go wrong here, and all three end with a cracked tube or a spill in the bucket:

    • Diameter and length. The tube has to seat in the bore without wobble, without hanging on the rim and without being forced in. A tube that is too long or too short sits badly and can fail at speed.
    • No improvised adapters. Use the adapter specified for that rotor, or do not run the tube. A hand-made shim changes the load path and is not a substitute.
    • Base shape. A pointed-bottom tube needs a rotor designed for pointed-bottom tubes. A flat-bottom upright tube is a bench container — many rotors will not accept it at all.
    Centrifuge tube rotor compatibility reference chart

    3. Speed and RCF: never assume a tube will hold

    Work to the rating printed for that specific tube, not to a general figure for the material. Standard polypropylene tubes cover the great majority of benchtop protocols; a step above roughly 15,000 ×g needs a model explicitly rated for that speed. Fifty-millilitre tubes with reinforced walls are used for spins up to about 12,000 ×g. If a protocol demands more than the tube is rated for, the answer is a different tube, not a lower fill level.

    4. Seal: screw cap or push-on

    The cap decides whether a volatile solvent stays in the tube and whether a sample survives months in the freezer.

    SealBest forLimit
    Screw cap with O-ringVolatile reagents, long-term storageBest protection against evaporation and leakage; slightly slower to open and close.
    Push-on capFast aliquoting, short routine spinsWeaker seal; not for volatiles or storage.

    5. Base shape

    BaseUse it forConstraint
    Pointed (conical)Pellet recovery from cell culture and precipitationOnly with rotors designed for pointed-bottom tubes.
    RoundGeneral workCompatible with most standard rotors.
    Flat-bottom uprightBench storage and handlingNot accepted by every rotor; not a spinning format.

    6. Material: what the grade actually changes

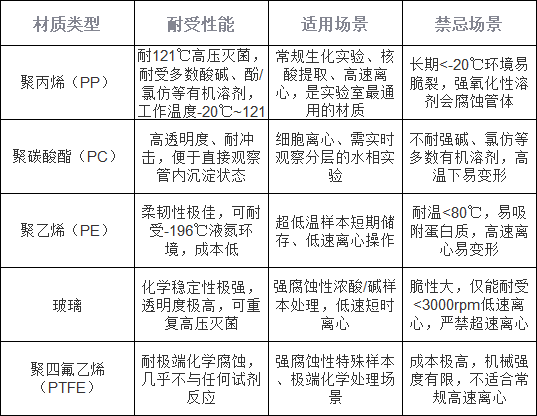
    Heat resistance, chemical resistance and mechanical strength vary between grades, and the three do not move together. The chart below compares them across the materials BUNSEN supplies. In practice the choice is driven by two questions: does the sample contain a solvent that attacks the polymer, and does the tube have to be autoclaved or frozen? Polypropylene answers both for most work — it resists acids, alkalis, alcohols, DMSO and most other organic solvents, and it tolerates both -80 °C storage and 121 °C autoclaving.

    Centrifuge tube material comparison chart: heat, chemical and mechanical resistance

    7. What actually wears a tube out

    Tubes rarely fail on the first use. They fail after repeated autoclaving has clouded the wall, after a solvent has softened it, after a hairline crack has opened at the cap thread, or after the tube has been run in a rotor it does not fit. Inspect the wall and the thread before reuse, and treat any tube that has been autoclaved repeatedly as consumable rather than permanent.

    Frequently asked questions

    Can any 50 mL tube go in a 50 mL rotor?

    Only if the diameter, length and base shape match that rotor. Check the bore and the base before the first run; a tube that wobbles or has to be forced is the wrong tube.

    What is the highest RCF for a standard tube?

    There is no single number — it is printed per model. Standard polypropylene covers most benchtop protocols, and work above roughly 15,000 ×g needs a tube rated for it.

    Do I need a screw cap?

    For volatile solvents and for anything stored beyond the same day, yes. A push-on cap is fine for fast aliquoting and short spins.

    Which base gives the best pellet recovery?

    The pointed base, because the pellet collects at a single low point instead of spreading across a flat surface.


    Note: The information on the scientific research products above is for reference only!
  • 96-Well Deep Well Plates: Volume, Dimensions and Uses

    The 96-well deep well plate is a high-throughput multi-well plate built to the ANSI/SBS microplate footprint. Its length and width are those of a standard 96-well plate; only the wells are deeper, so each one holds several times the volume. That combination — a standard footprint with a much larger working volume — is why deep well plates have largely replaced racks of 1.5 mL tubes in storage, purification and automated workflows.

    What makes a deep well plate different

    A standard 96-well plate is designed for optical reading or cell culture, where a few hundred microlitres per well is enough. A deep well plate keeps the same 96 positions and the same outer dimensions but extends the wells downwards. The plate therefore still loads into the same readers, handlers and centrifuge carriers, while giving every well enough volume to hold a real sample.

    Working volumes across the range

    Working volume per well runs from 0.33 mL to 10 mL. The models used most often are 1.0, 1.2, 1.6, 2.0 and 2.2 mL — roughly the capacity of a 1.5 mL centrifuge tube, in a format that can be handled 96 samples at a time.

    Working volume per wellWhat it is for
    0.33 mLLower end of the range, for small-volume work that still needs a 96-position format.
    1.0 – 2.2 mLThe common models (1.0, 1.2, 1.6, 2.0 and 2.2 mL). A direct stand-in for 1.5 mL tubes when samples are processed in bulk.
    up to 10 mLUpper end of the range, for larger-volume sample handling.

    Well shape and bottom profile

    Two bottom profiles are standard. A U-shaped bottom mixes the sample more thoroughly and suits work where the whole well volume has to stay homogeneous. A V-shaped bottom concentrates material at a single point and increases the contact area for heating. Wells are also available round or square, and square wells make it easier to drive a pipette tip straight down without catching the wall.

    OptionWhy choose it
    U-shaped bottomThorough mixing of the sample.
    V-shaped bottomHigher sample recovery and a larger heating contact area.
    Round wellsStandard geometry, compatible with most multichannel work.
    Square wellsEasier vertical insertion of pipette tips.

    Material and temperature range

    Deep well plates are moulded from medical-grade polypropylene (PP). PP resists acids, alkalis, alcohols, DMSO and most other organic solvents, and it holds at both ends of the working range: plates are stored at -80 °C for extended periods and can be autoclaved at 121 °C.

    Sealing options

    Three sealing formats cover most workflows. Heat-sealable film gives the tightest seal and is the usual choice for long-term frozen storage. A silicone gasket allows repeated sampling through the seal. A snap-on lid is the quickest option when the plate is opened and closed many times in a day.

    SealBest for
    Heat-sealable filmMaximum airtightness, long-term frozen storage.
    Silicone gasketSampling through the seal without resealing the plate.
    Snap-on lidFrequent opening and closing.

    Automation compatibility

    Outer dimensions follow the ANSI/SBS standard, so the plate loads directly onto automated liquid handling workstations, robotic arms, multichannel pipettes and autosamplers. No adapter is needed, which is the main reason deep well plates sit at the centre of high-throughput workflows rather than at their edge.

    Cleanliness and biosafety

    Plates are manufactured in a Class 100,000 cleanroom, and third-party testing covers DNase, RNase, pyrogens and endotoxin — the four checks that decide whether a consumable can be used in a sterile or nucleic-acid workflow. If a specific assay requires certified sterility rather than low bioburden, confirm the sterilization status of the exact catalogue number before ordering.

    What deep well plates are used for

    • High-throughput sample storage. DNA, RNA, protein and compound libraries can be stored 96 at a time instead of in individual tubes — far less space in a -80 °C freezer, and far easier to keep a collection in order.
    • Nucleic acid and protein purification. Magnetic-bead extraction, plasmid prep, NGS library preparation and immunoprecipitation all run in deep well plates, from lysis through washing to elution, without transferring samples between vessels.
    • Compound and library screening. Storage, dilution and dispensing of compound libraries, siRNA libraries and hybridoma screens — the plate is what makes a screen high-throughput in the first place.
    • Sample preparation ahead of LC. With a multichannel pipette or a handler, precipitation, liquid–liquid extraction and solid-phase extraction can be run in batches. The plate then feeds an autosampler directly, so samples never have to be moved into vials.
    • Cell culture and functional assays. Suspension culture and high-throughput cell-function work both run in deep well plates. Low-binding versions reduce non-specific protein binding, which matters when measuring proteins secreted by cells.
    • Other parallel work. Small-scale parallel chemistry, multi-parameter environmental monitoring and batch pre-treatment for food safety samples all use the same format.

    Frequently asked questions

    Are deep well plates sterile?

    They are produced in a Class 100,000 cleanroom and tested for DNase, RNase, pyrogens and endotoxin. That is not the same as a certificate of sterility, so for sterile workflows check the sterilization status of the specific catalogue number.

    Can deep well plates be frozen at -80 °C?

    Yes. Polypropylene withstands prolonged storage at -80 °C, and the plate is also autoclavable at 121 °C.

    Will they fit my automated liquid handler?

    Yes, provided the instrument accepts ANSI/SBS microplates — which nearly all do. The outer dimensions are standard, so no adapter is required.

    Which bottom shape should I choose?

    U-shaped if the sample has to stay fully mixed, V-shaped if you need to concentrate material or heat it efficiently. Square wells are the practical choice when tips are inserted vertically by a handler.


    Note: The information on the scientific research products above is for reference only!
  • Paper vs Plastic Cryopreservation Trays Compared

    This guide to selecting cryopreservation boxes will present practical comparisons based on two key criteria—cost and low-temperature resistance—to help you identify the best value-for-money solutions for different specimen scenarios.

    Cost over the full cycle, not per unit

    There are significant differences in the procurement costs and long-term running costs of the two types of cryopreservation boxes, which directly determine the efficiency of laboratory consumables budget allocation:

    Long-term running costs: Paper cryopreservation boxes are single-use consumables; once they become damp or the laminate is damaged, they are immediately discarded, incurring no subsequent maintenance costs; PP/PC plastic cryopreservation boxes can withstand high-pressure sterilisation at 121°C sterilized.

    Associated hidden costs: Paper boxes are 60 per cent lighter than plastic boxes and require no additional reinforcement or protection; they can be placed directly on ultra-low temperature freezer shelves without occupying dedicated cryopreservation racks; plastic boxes are compatible with the full range of standard cryopreservation racks and are compatible with automated specimen access equipment, eliminating the need for additional modifications to the storage system.

    A Guide to Choosing Cryopreservation Trays | Paper versus Plastic Cryopreservation Trays: A Comparison of Cost and Low-Temperature Resistance

    Performance at −80 °C and in liquid nitrogen

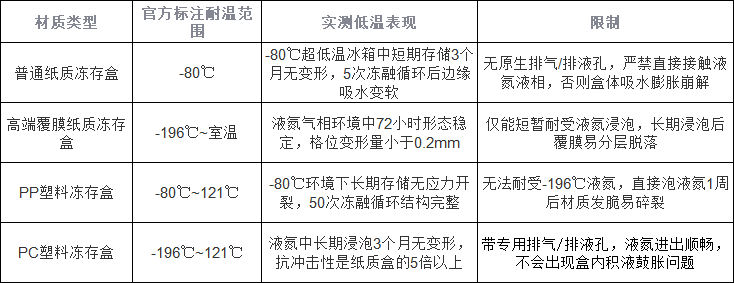
    The low-temperature tolerance limits of cryopreservation boxes made from different materials vary considerably; choosing the wrong one will result directly in specimen being scrapped:

    A Guide to Choosing Cryopreservation Trays | Paper versus Plastic Cryopreservation Trays: A Comparison of Cost and Low-Temperature Resistance

    Choosing by scenario

    Taking into account both cost and low-temperature performance, the selection options for different specimen scenarios are as follows:

    Prioritise paper-based cryopreservation boxes: suitable for standard clinical testing specimen, experimental control groups specimen and other low-value batches specimen, such as standard clinical testing specimen and experimental control groups specimen, for dry short-term storage at –80°C ultra-low temperature freezer (for up to three months) where frequent removal and replacement are not required; this can significantly reduce consumables procurement costs.

    PP plastic cryopreservation boxes are the preferred choice: suitable for routine cell cryopreservation and long-term storage at –80°C, they are ideal for most standard laboratories. They can be repeatedly autoclaved sterilized and offer good value for money.

    PC plastic cryopreservation boxes must be selected: suitable for the precious ‘seeds’ of cell banks and gene banks specimen, as well as active specimen requiring long-term storage in liquid nitrogen, high-value specimen subject to frequent and repeated retrieval and storage, and to mitigate the risk of specimen loss caused by container rupture at low temperatures.

    Ordering mistakes

    Do not be misled by claims that standard paper cryopreservation boxes ‘can be immersed directly in liquid nitrogen’; even perforated, laminated versions can only withstand the gaseous phase of liquid nitrogen for a short time, and direct contact with liquid nitrogen is strictly prohibited.

    When purchasing plastic cryopreservation boxes, do not be tempted solely by low prices; boxes made from low-cost recycled PP will become brittle and crack after just one month at -80°C. It is essential to choose compliant products made from brand-new, medical-grade raw materials.

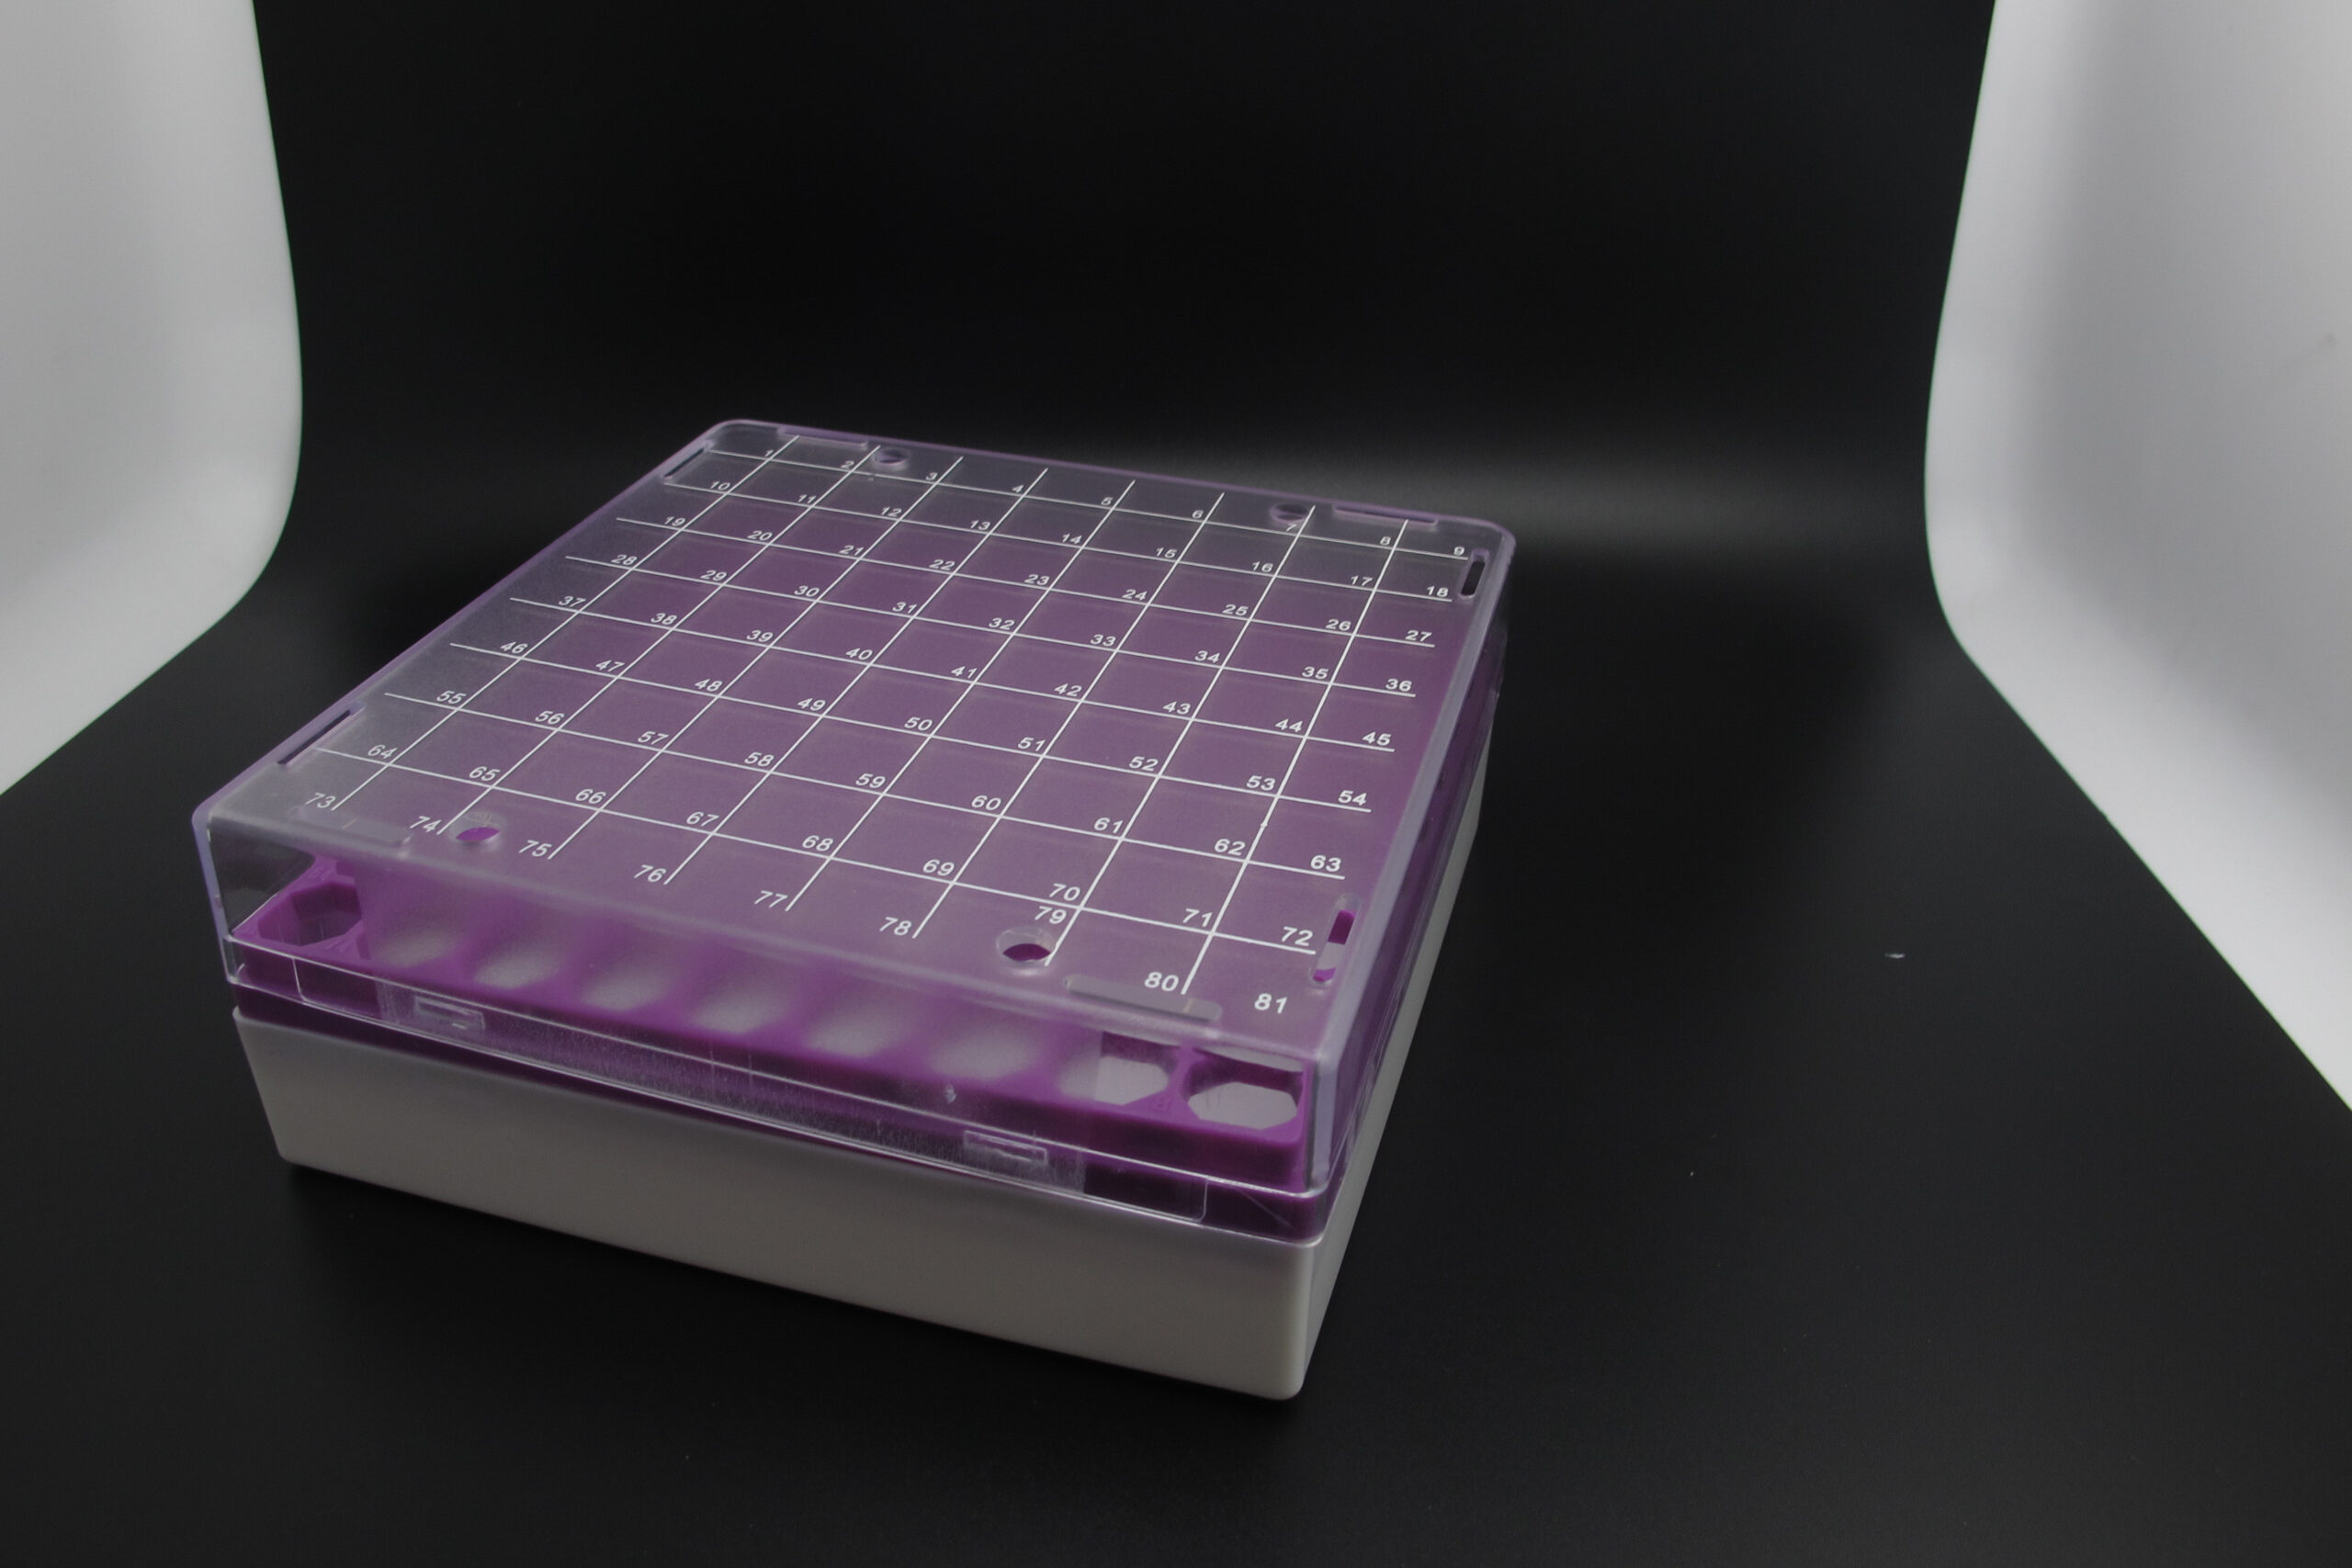
    The 81-well (9×9) configuration of both types of cryopreservation trays is ergonomically designed to optimise tube retrieval; it offers a high margin for error when picking up tubes with the fingers. This configuration is the preferred choice for manual operations to avoid accidentally touching neighbouring tubes when retrieving tubes manually from 100-well trays specimen.


    Note: The information on the scientific research products above is for reference only!
  • Filter Pipette Tips: Fit, Sealing and Aerosol Control

    A filtered tip only protects the experiment if it fits the pipette properly. Two things have to happen at once: the cone of the tip has to seal against the nozzle, and the filter has to sit far enough up the barrel that it never touches liquid. When both are right, the tip removes aerosol from the airflow and the pipette delivers the volume it was calibrated for. When either is wrong, you get a leak, a short aspiration, or a filter that has been wetted and has stopped filtering.

    How the tip and the pipette work together

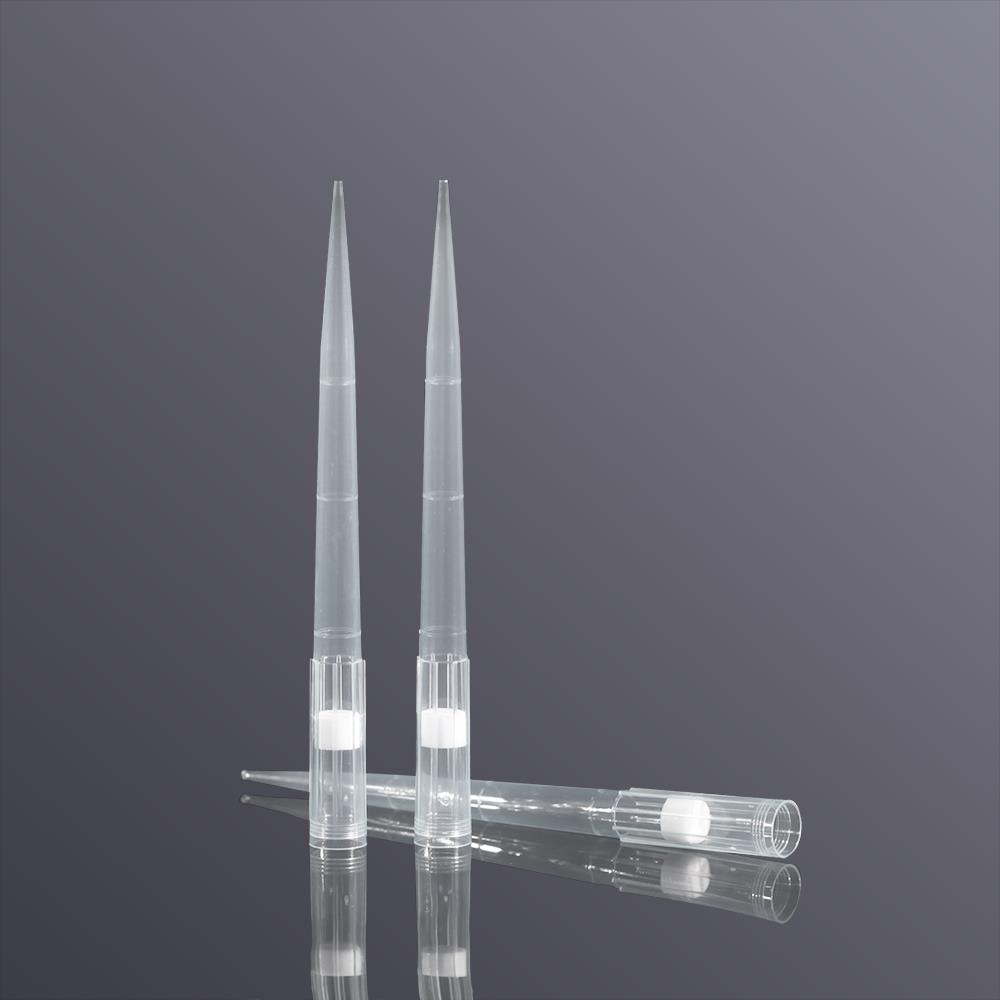
    A filtered tip carries a hydrophobic high-density polyethylene filter inside the barrel. It intercepts more than 99 % of aerosol that backflows from the sample, which keeps the inside of the pipette clean, stops carry-over between samples, and removes the most common cause of false-positive PCR results.

    For that to work, the tip cone has to seat on the nozzle without a gap. Any gap means the negative pressure generated by the piston is not fully transmitted to the liquid, and the pipetting error moves outside ±1 %. In a correctly matched system the filter is also specified so that its airflow resistance does not obstruct the return stroke of the piston — otherwise aspiration at very small volumes becomes incomplete.

    Filtered pipette tip seated on a pipette nozzle — aerosol filter and sealing cone

    Matching tip size to pipette range

    Tip rangePipette rangeTypical use
    0.1–10 µL0.5–10 µLqPCR, single-cell sequencing, library preparation; the fine, often extended tip keeps capillary action from distorting the volume
    10–100 µL10–100 µLPCR set-up and nucleic acid extraction, including multichannel work; a low-binding wall reduces residue of nucleic acid and enzyme
    100–1000 µL100–1000 µLStandard extraction and reagent aliquoting, on manual and motorised pipettes across the leading brands
    1–5 mL1–5 mLBulk nucleic acid extraction and medium preparation; the filter balances flow rate against aerosol retention

    Fitting the tip to your platform

    Manual pipettes

    Press the tip on vertically and give it a slight twist to seat it. Do not hammer it on — forcing the tip deforms the cone and is the usual reason a tip will not eject cleanly. To check the seal, invert the pipette for ten seconds: if nothing drips, the fit is good.

    Most pipette ranges are colour-coded, so matching the colour of the tip to the colour of the pipette removes most of the risk of picking the wrong box. If a tip will not eject, or the pipette drips during dispensing, the tip is simply not the right model for that pipette and should be replaced rather than worked around.

    Automated pipetting workstations

    Robotic platforms need tips held to tight tolerances — typically ±0.2 mm in length and ±0.1 mm in diameter — so that the arm can pick and place them repeatably. Tips outside tolerance either drop out of the holder or jam in it, and both stop the run.

    Dedicated platforms such as Rainin LTS and Agilent Bravo use their own tip geometry, so they need the platform-specific tip rather than a universal one. Some racks carry optical identification marks that the instrument reads automatically, which allows the run to proceed without manual confirmation.

    Once the fit is right, the system supports continuous high-throughput pipetting. In sequencing sample preparation and high-throughput screening, the reproducibility of dispensed volume is markedly better than the same work done by hand.

    Using the system through a molecular workflow

    Before use. Check that the filter is intact and that the packaging states DNase-free, RNase-free and pyrogen-free. A substandard tip introduces contamination before the experiment has started.

    While pipetting. Keep the pipette vertical, and never let the liquid level reach the filter. Once the filter is wetted it loses its hydrophobic behaviour and stops intercepting aerosol, which is exactly the failure you bought the filter to prevent.

    Maintaining the pipette. Check piston airtightness at regular intervals. If accuracy has drifted, clean the inside of the pipette before continuing — residue left by aerosol will affect every sample that follows.

    Do not reuse. A filtered tip is a single-use consumable. Autoclaving or repeated sterilisation damages the hydrophobic structure of the filter and leaves the tip with no aerosol protection at all.


    Note: The information on the scientific research products above is for reference only!